
Before you start
Have the plugin ZIP file to hand (aiq-ecommerce-1.1.0.zip) and make sure you are logged in as an administrator. If this site is live and busy, take a backup first — as you would before installing any plugin.
Uploading the plugin
You can install it through the WordPress admin, or by FTP if your host restricts plugin uploads.
Through the WordPress admin (usual method)
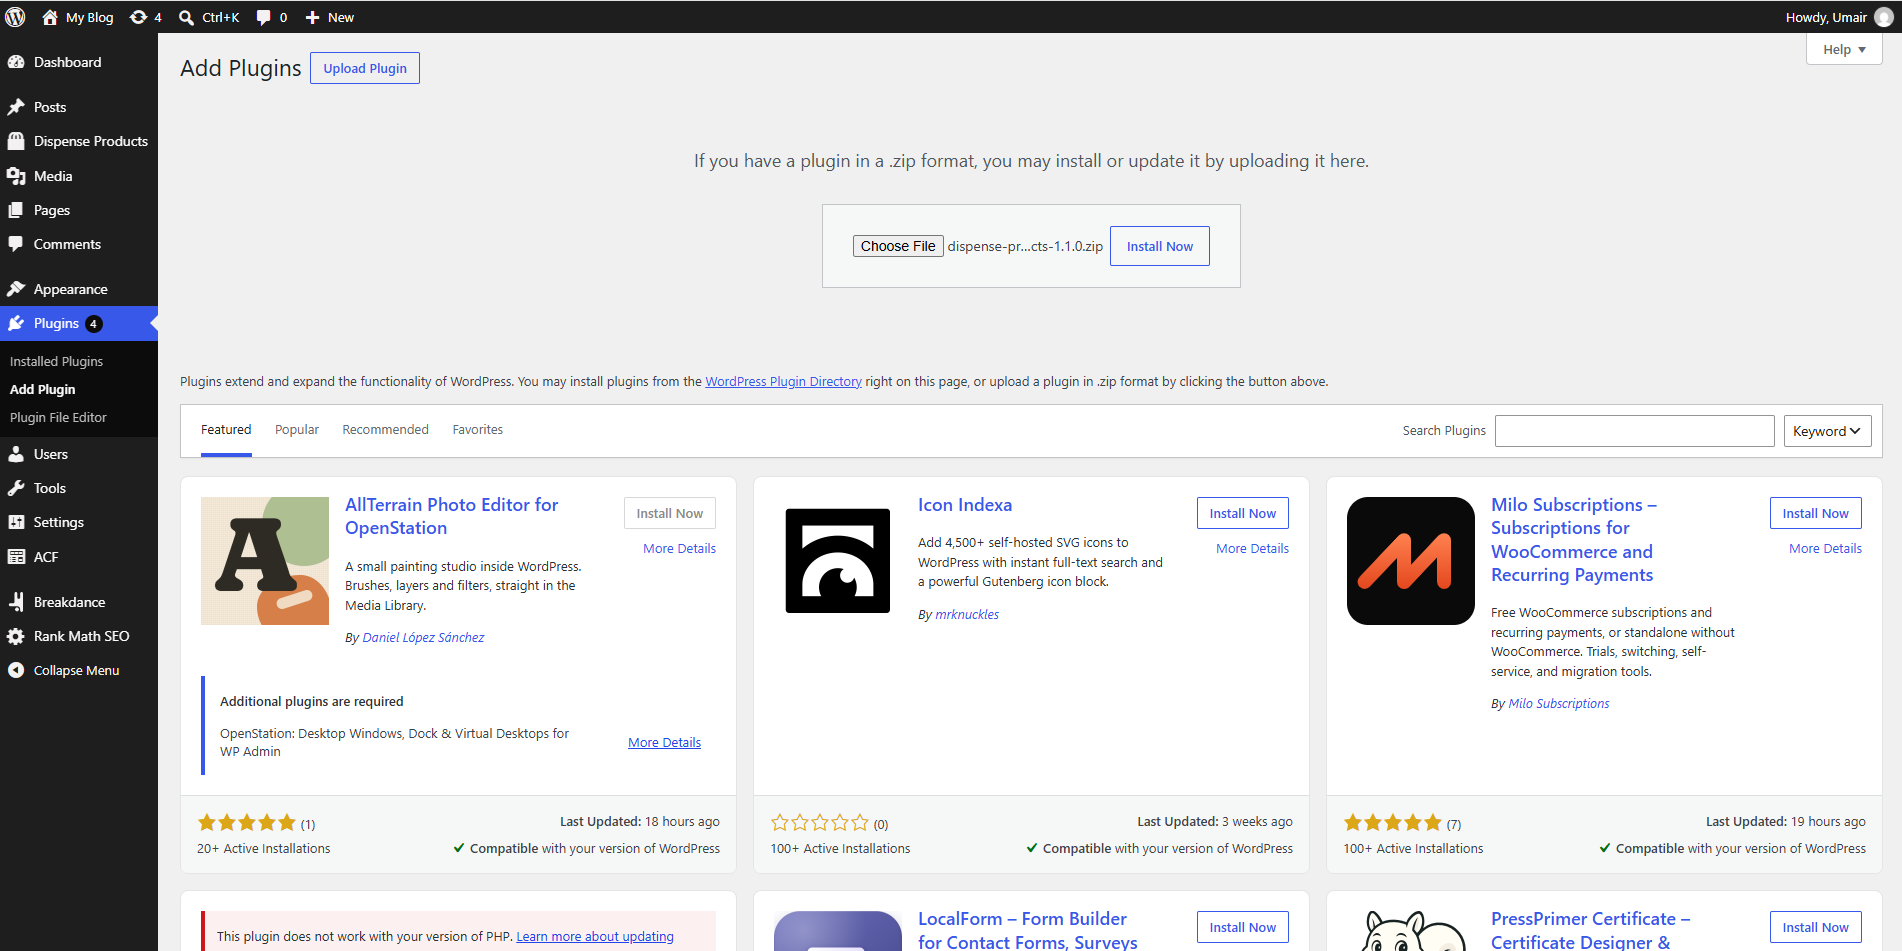
- Go to Plugins → Add New.
- Click Upload Plugin at the top of the screen.
- Click Choose File and select
aiq-ecommerce-1.1.0.zip. - Click Install Now and wait for the upload to finish.
By FTP
- Unzip
aiq-ecommerce-1.1.0.zipon your computer. You will get a folder calledAIQ Ecommerce. - Upload that whole folder into
/wp-content/plugins/on your server. - The result should be
/wp-content/plugins/aiq-ecommerce/dispense-products.php.
Upgrading from an earlier version
Install straight over the top. Nothing is deleted:
- Products, offers, taxonomies, venue selections and settings are all untouched.
- If you are coming from 1.0.x, syncing pauses until you enter a Client Key, and an admin notice says so. Products already published stay published, and the storefront keeps working.
- Saving a Client Key removes any AIQ Ecommerce API credentials the older version left on the site.
Activating it
- Go to Plugins → Installed Plugins.
- Find AIQ Ecommerce Products in the list.
- Click Activate.
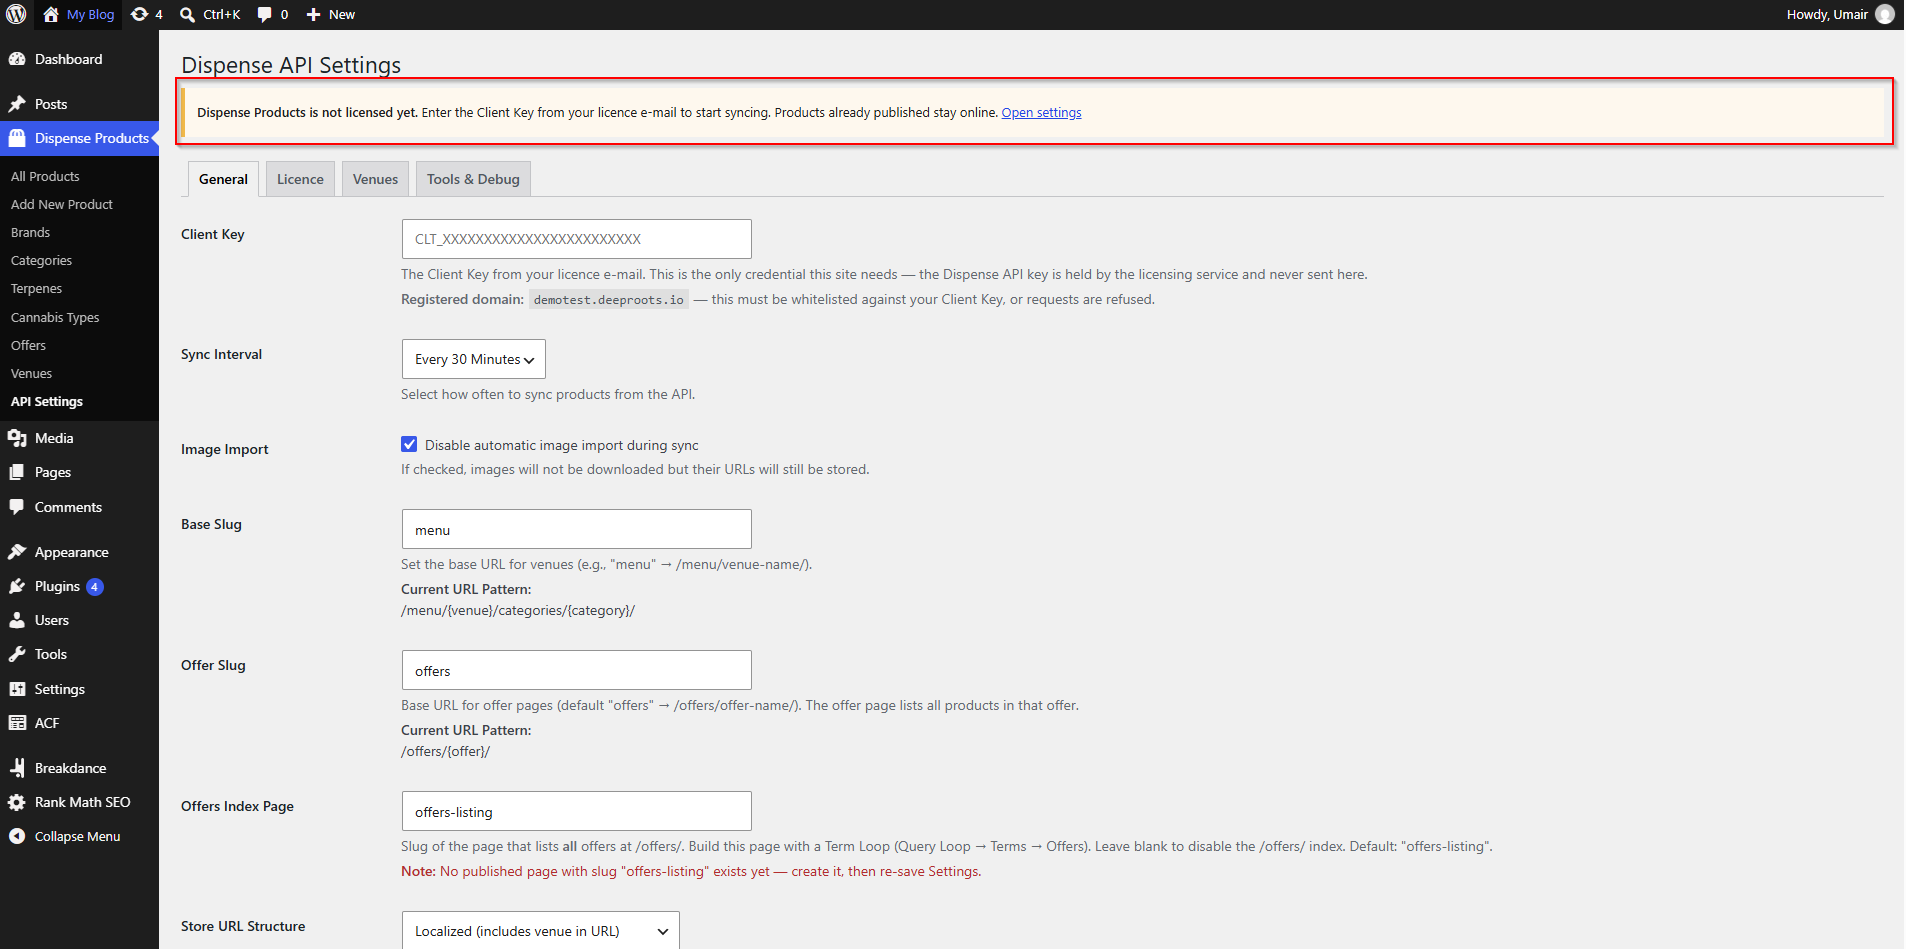
Straight after activation you will see a yellow notice at the top of the admin:
That notice is expected. It is telling you the one thing still outstanding — see Connecting Your Store.
Finding the settings screen
The plugin adds a AIQ Ecommerce Products item to the WordPress admin menu. The settings live underneath it:
AIQ Ecommerce Products → API Settings
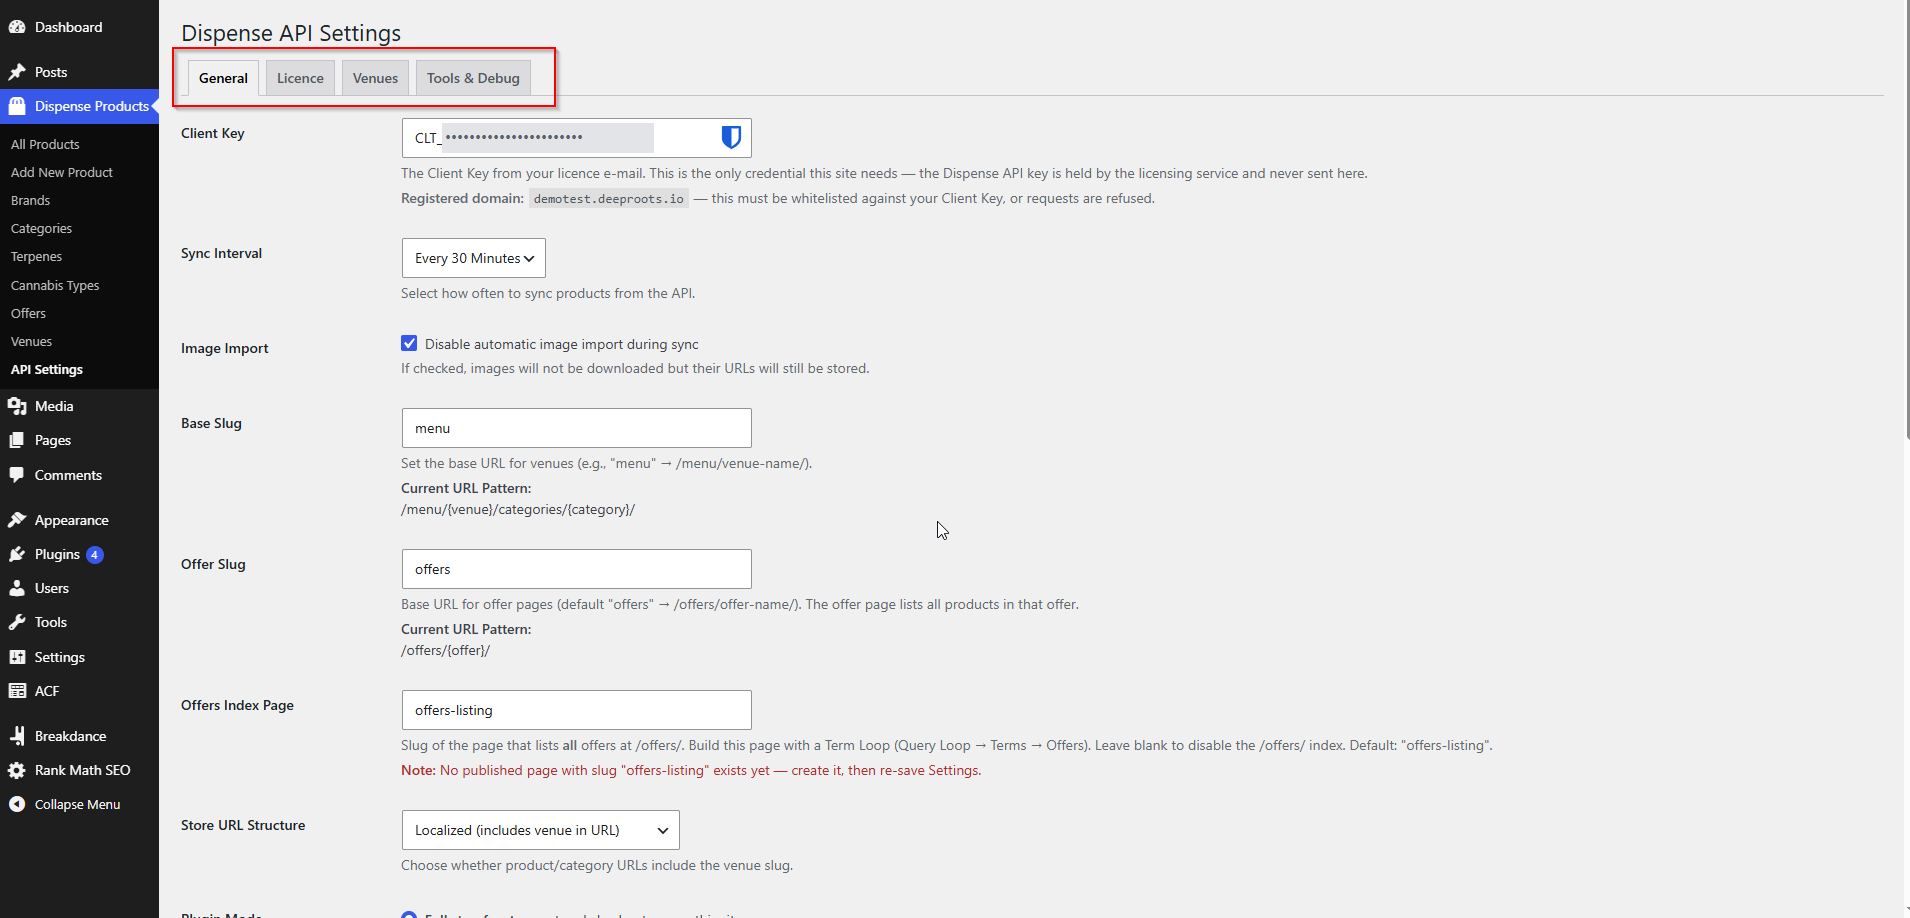
The settings screen is split into four tabs:
| Tab | What lives there |
|---|---|
| General | Client Key, sync interval, URL slugs, plugin mode, checkout page, cart icon, products per page, FacetWP integration |
| Licence | The masked Client Key, the domain this site presents, the licensing service address, the last successful call and the last error |
| Venues | The list of venues on your licence, with tick boxes for the ones you want to sync |
| Tools & Debug | Test Connection, Custom CSS, Manual Sync, Sync Status and the last request's debug information |
What gets created on your site
Activating the plugin registers a number of things. You do not have to do anything with them, but it helps to know they are there.
Post types
| Name | Key | Where you see it |
|---|---|---|
| AIQ Ecommerce Product | dispense_product |
AIQ Ecommerce Products → All Products |
| Venue | dispense_venue |
AIQ Ecommerce Products → Venues |
Taxonomies
| Name | Key | Public URL |
|---|---|---|
| Brand | dispense_brand |
/brand/{slug}/ |
| Category | dispense_category |
/categories/{slug}/ |
| Offer | dispense_offer |
/offers/{slug}/ (base configurable) |
| Terpenes | dispense_terpenes |
/terpenes/{slug}/ |
| Cannabis Type | dispense_cannabis_type |
/cannabis_type/{slug}/ |
| Venue | dispense_venue_tax |
/dispense-venue/{slug}/ |
Scheduled task
A recurring job called dispense_products_cron_sync is scheduled, defaulting to every 30 minutes. It does nothing until a Client Key is entered.
A Checkout page
In Full storefront mode, the plugin creates a page called Checkout containing the [dispense_checkout_iframe] shortcode, ready for you to point the settings at.
In Sync only mode this page is never created — and if you delete it, it is not silently re-created.
Permalinks
Activation flushes your permalink rules so the new product and taxonomy URLs work immediately. If product URLs ever 404 after a settings change, go to Settings → Permalinks and click Save Changes without altering anything — that re-flushes them.
Common problems
The upload failed — the file exceeds the maximum upload size.
Your host’s PHP upload limit is smaller than the ZIP. Either ask them to raise upload_max_filesize, or install by FTP instead.
Plugin could not be activated because it triggered a fatal error.
Usually an outdated PHP version. Check Tools → Site Health → Info → Server for the PHP version and ask your host to raise it.
I don't see a AIQ Ecommerce Products menu.
Check the plugin is genuinely active under Plugins → Installed Plugins, and that your user account has the Administrator role. The settings page requires the manage_options capability.
I activated it and nothing is syncing.
Correct — nothing syncs until a Client Key is entered. That is the next article.